Monday 19 December 2016

Lesson 5 - scale furniture - Study Task

Creating scale furniture

Shezlong

Bookcase


Rococo Armchair
The example to the right is a template of the rococo armchair. I obtained this template from David Neat. The construction of this piece is much the same as the construction of the shezong. To construct this piece of furniture I would first shrink down the image to the correct scale before printing it out and spray mounting it to foamed PVC. I would use foamed PVC due to its toughness and and ability to maintain its shape without fraying even when the individual pieces are fairly small, such as the arms and front legs. Mount board would be too floppy and weak. 
After cutting out the pieces I would trace down the seat of the armchair on KAPA line foam board. The KAPA line foam board will serve as the cushioning for the chair. One the KAPA Line has been glued and sanded to the correct dimensions I would glue the seat to the back of the chair. Following this, I would trace around the back of the chair with the foam cushioning for the seat being flush against the side. This is to ensure that once cut, the cushioning for the back will sit nicely on top of the cushioning for the seat.
After this step has been completed it is time to add the front legs and the arm rests. The legs should be added at the same angle either side for symmetry and a more natural looking chair. Additionally, the arms should jut out slightly. 


Bed
- Version 1

This bed was created using modeling wire, mount board, fabric, KAPAline foam board and a glue gun. The first step is to create two basic frames out of a length of modelling wire. This is most clearly seen in RI1. When creating the frame it is easiest to create the curve first and then glue in the bottom rung. The bottom rung is what the mount board will be glued to. Once this has been created individual sections can be added on for additional detail. Once you have two frames, a piece of mount board is cut to the correct dimensions and is glued between them. This gives the bed the basic shape.
You are now ready to start creating the mattress and pillows. The mattress is simple a section of KAPAline that has had its edges sanded down to give it a slight curve. The pillows follow the same process but with a much greater curve and a much smaller size. The bed is then covered with a material of your choosing.
Top Tip! When creating furniture it is often much better to create combined legs rather than attempting to stick on individual ones!
Reference Image 2

Reference Image 1.
- Version 2
Another way I have found to make a bed makes use of KAPAline foamboard, tissue paper and mountboard. A range of different headboards are easily swapped in but I decided on a quick triangular one to keep the set simple. One problem with the example below is that i failed to take the width of the KAPAline into consideration. This meant that both the toe and head board come off as slightly more unnatural looking.
To create the bed, the legs and base are cut out first. The shape of the base is traced onto some KAPAline, which is then cut out and sanded down to size. The pillows are cut out to the required dimensions and are once again sanded down to size.

Lesson 3 + 4 - Painting and texturing - Study Tasks - 11/11/16

Study Task - Using sample pieces as examples, describe how you could apply these modelling materials and techniques to create surfaces and textures on a model.
Include - Foliage, Soil, Rocks, Concrete, Gravel, Tiling, Brickwork, Stonework, Paving and Wooden Planking

Techniques and Effects

Cut Paper Method
This method is the cutting up and overlapping or spacing of ticket card to create textures similar to wooden planks and tiles. It can also be used to represent brickwork. This can then be painted to achieve different effects, such as wood, marble and brick. The model box for for Trifles is a great example of this as Andrea Grutzner has used this method to create a wooden cabin. For this set she was aiming to create a dark, realistic and masculine set. This is immediately seen in her choice of colours and composition. In this example, she overlaps card to give the impression of wooden planking, which she then paints using darker colours to create gloomy tones. In my own example above I attempted to recreate tiling, wood flooring and paneling. I opted to leave the balsa wood flooring unpainted because I felt that painting it would make it lose some of the living wooden quality. To the right is a reference picture of different tile types.

Scoring Method
The scoring method is the cutting into materials in order to reflect different textures. This method is perfect for materials such as balsa wood and mount board due to their thickness and soft qualities. It is usually used to create brickwork, flooring, tiles, and tongue and groove.
To the right are my own attempts to recreate tiling, brickwork and wooden flooring. I much preferred this method to the cut paper method because I think that the finished models come off as cleaner and generally more realistic. However, I do think I could have tried harder to recreate a good wooden colour for the flooring. The brick work is probably my favourite because of the texture and colouring. When creating them I simply cut into the mount board and balsa wood with my craft knife.
Trifles - Andrea used the scoring method to create her wooden panel flooring. This is preferred to the cut paper method has it gives a smoother finish.
Harry Potter - The Harry Potter example has made use of this method for both the grass and the towers. I think that this works especially well for the towers because it gives them a more rustic feel. The designer may have used balsa wood to give the towers an added "living" quality.
For the grass the designer opted for the scoring cut paper method. This may have been to demonstrate how clean and neat the field looked. However, I think that this makes the model come off as a little unnatural.
Carving Method


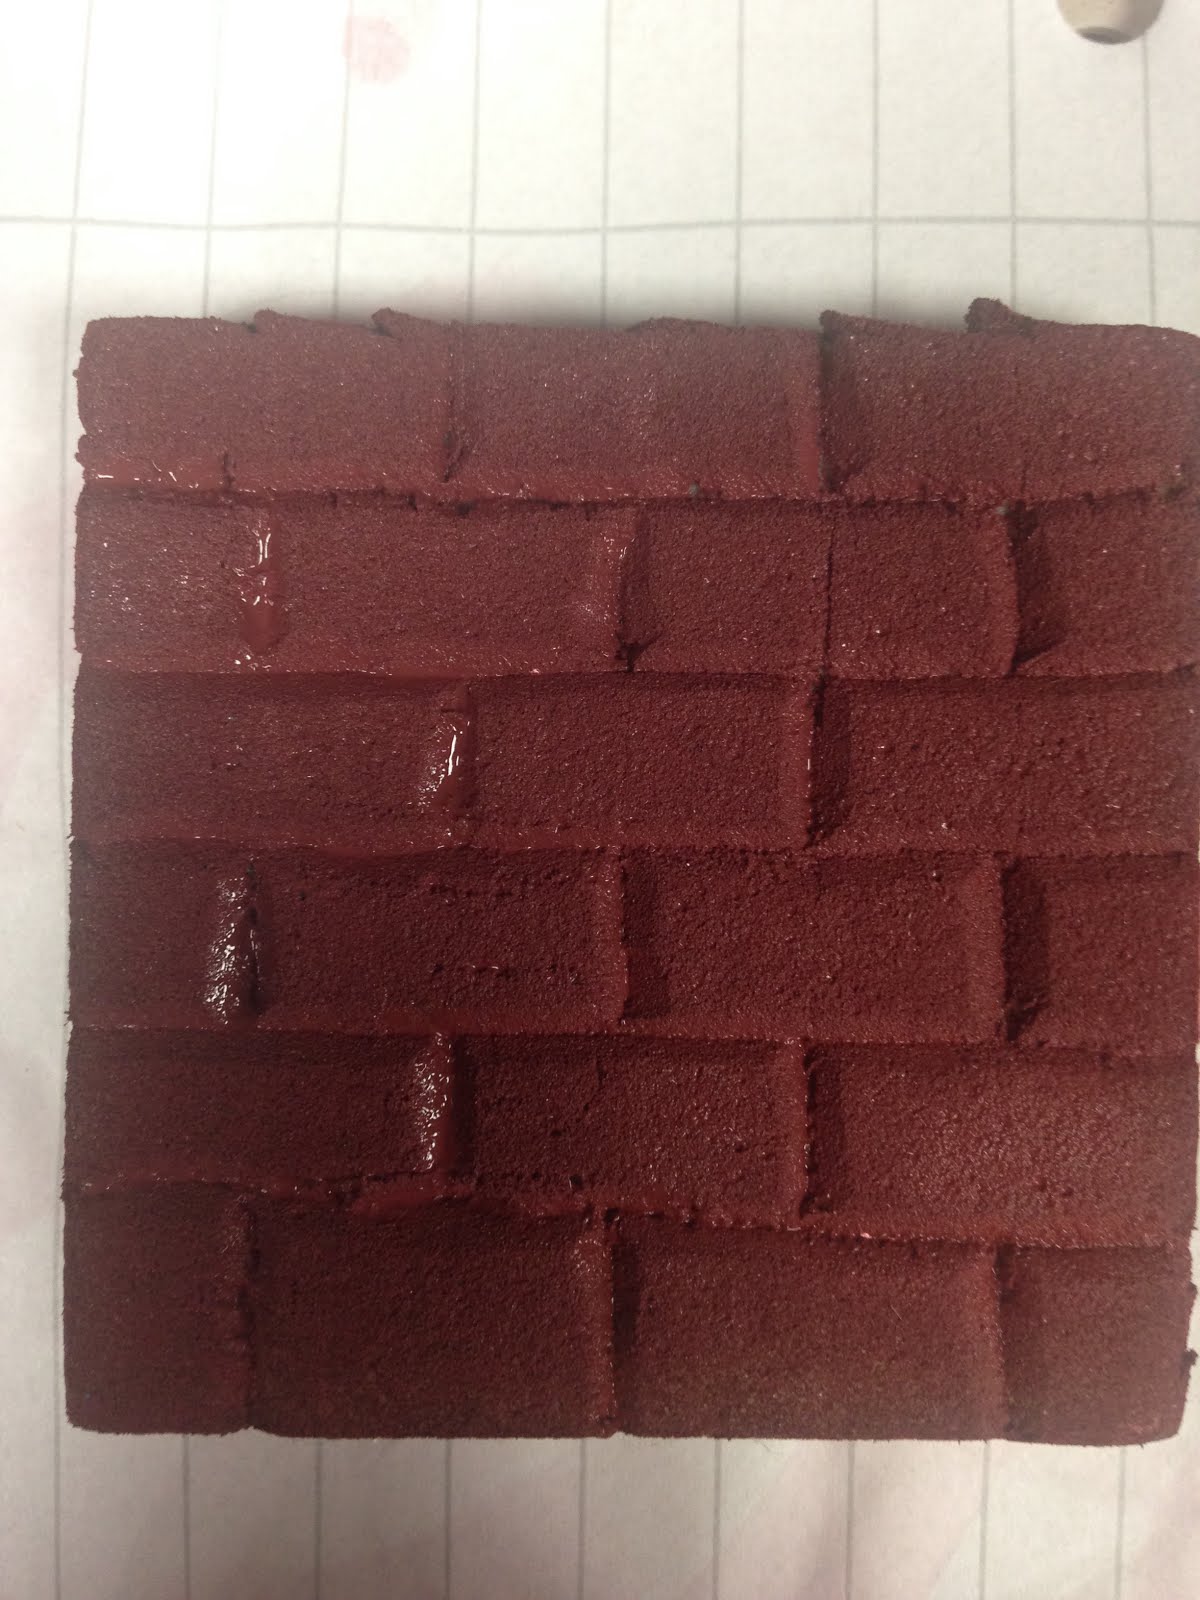
The carving method is the cutting into KAPAline foamboard to create different textures, such as brickwork, tiling and rock. The above shows examples of brickwork and stonework. When painting the brickwork I mixed red and brown acrylic paint to get a slightly diriter and darker red. To create the indentation I ran my craft knife at a slight angle all the way across the wall and then again with the opposing angle.
When creating the rock face I compiled some reference images to work off and then tried to copy the same formations. This was once again acheived by using the craft knife at an angle. One area I think I didn't perform too well in was the colouring. In hindsight I should have used more brown in order to get a dirtier, more natural rock colour.
Scatter Materials

Grass
- Mixed herbs, oats, sand, dyed sawdust, fine cork
I'm reasonably pleased with how my grass turned out as I feel like they are accurate representations of grass. However, if I were to create additional examples I would try a greater range of colours as I have mostly stuck to the same basic colour. I also didn't use any mixed herbs and my work suffers a bit from this.
Concrete
- Sand, cork & polyfilla, gravel, sesame seeds
I am probably the least pleased with the concrete work as I feel like there is little variation between the different textures. If I were to revisit the texturing I would like to experiment with smoother materials.
Earth
- oats, dyed sawdust, sugar and sand, fine cork & polyfilla, vermiculite
I am most pleased with my earth examples as they show the most variety in bth colour and texture.
Snow
Sand, sugar
Vermiculite

Top Tip! sugar dissolves in polyfilla, which cracks and gives a great cracked concrete effect. Unfortunately, my attempt to do this yielded poor results.

Harry Potter - Although this example did not use scatter materials, I think that it provides a good example of a set where scatter matierials would be better suited.

Polyfilla
Polyfilla is used on its own or in conjunction with scatter materials to create textures with more depth, like rocks, concrete and earth. When combined with sugar, the sugar has a tendency to crack, which creates a nice, broken surface that is perfect for ice or split concrete.

 1) Trifles - Andrea Grutzner

Image result for harry potter set model 2) Harry Potter, Quidditch Field - Stuart Craig


Study Task 2

Q1: Why do we need texture on a model?
The primary use of a set model is a communication tool. The added texture means that more information can be obtained by the different disciplines.
For example, scenic artists may look at the different techniques they will need to use in order to achieve the desired effects.
Set builders are able to look at any three dimensional formations they may need to create, such as rockfaces and brick walls.
Stage Managers. Snow.  Health and safety?
Q2: How can paint effects and the selection of colour aid a model?
Shadows? Atmosphere? Lighting?
Q3: Find an example of a successful model and explain why.
This is a set model created by Beth Tearle and designed by -insert-. I find this to be a great example of a set model as it is a realistic depiction of what the final set will look like. It is to the correct scale and includes texture, colours, and spacing. This means that is a valuble tool to several disciplines as listed below.
Scenic Constructors
The construction team are able to see exacly what the set consists of. This will help them decide on the materials they'll use and the way these materials will be put together. For example, they'll be able to see that people sit upon the stairs. This means that they'll get the look of the piece correct while also knowing that it needs to be structually secure enough to be climbed and sat on.
Scenic Artists
Scenic artists can immediately
Stage Managers
A stage manager could look at this and see that actors will be working at height at points during the performance and so will be able to risk asses accordingly.
Costume Department
The designer has already started to include basic costumes
Actors
This is the first time the actors will be able to see the space they'll inhabit during the performance. It could help give them faith in the design time and the production. Additionally, it could help tone/atmosphere of the piece and affect how they perform.

Q4: Find an example of a flawed model and explain why.
A Doll's House
This is a model box I created for a basic set design for a touring production of 'A Doll's House'. It also happens to be a prime example of what not to do when creating a set model box. The reasons for this are as follows:
  • Lack of colour amd texture
The lack of colour means that scenic artists are not able to see the designs I want and are not able to directly transfer the design to the actual set. There are a few basic designs on the flats but these are crude and should the scenic artist choose to follow these, the set itself will come out looking clunky and rough.
  • Inaccurate Scale
One of the most important things a set model needs to get right is the scale. An inaccurate scale means that scenic constructors will not be able to get the measurements they need and there is a much greater risk of a piece not being to the correct measurements. However, This is not a major issue with this particular set as I did try to get everything (excluding the Christmas tree) to roughly 1:25 scale. Starting out with immediate accuracy is a good way to ensure that the finished comes out looking natural and is a more effecting communication tool.
  • Lack of set dressing
The almost total disregard to set dressing means that the model comes off as plain and uninhabited. Actors will not be able to see the type of set they will inhabit during a performance and so will not have the chance to alter the way they play their characters. This may cause them to lose faith in the designer and possibly the entire production.

In conclusion, this is a travesty of a set model because the model maker utterly failed to include almost all of the aspects that make a model a good communication tool. It is bland and only conveys some of the simplest ideas. However, it may have some use as an early sketch model as it would reasonably quick to produce and would show the director the designer's early ideas.

Constructing a scale door - 25/11/16

Process of Constructing a 1:25 Scale Door


Marking Out - Lesson 6

Step 1 - Centre Line
The first step to creating a 1:25 scale door is to find the centre point and draw a line running vertically up the mount board. Your centre line will be a vital component throughout the construction of the door as it will be what you take all your measurements from. Then measure 6000 mm up either side of the mount board and draw a line that connects them. The space underneath this line is where you shall begin to mark out your door.
Step 2 - Door
This is the marking out of the door itself. First, the width of the door is measured and two vertical lines are drawn to the required door width, both being equal distances from the centre line. The height is measured from the floor to the base of the door. This is where your door begins. Steps will be added during the building phase. The top of the door is then added. My door was slightly different so I had to construct a set of treads and mark out my door to those dimensions.
Top Tip! Most doors are 200 - 205 cm in height and it is wise to stick between these measurements.
Step 3 - Frame
The width of the frame is measured and added in a similar style to the door. If you find that the width of the frame differs slightly on either side then it is easier to just pick one measurement and stick to it.
Step 4- Steps
On the mount board this step is the marking out of where each step begins and ends.
To create the treads I followed a basic template given in an earlier lesson. In my opinion, the steps I made were not to the best of my ability, but I feel that I was able to get away to it thanks to filler materials, texturing and the fact that my door wasn't very even anyway. In the future I will take my time more to get everything the way it should be.
Step 5 - Windows
The windows are drawn out using the centre line and other structers as a
Step 6 - Tabs (1 x 4 m) & Supports
Top tip! It is idea to have three triangular support braces for each tab.
Step 7 Recesses
Recesses are what separates us from children. They help give the model depth. I measured out a 30 cm recess because I thought it best fit the picture I was given of the door. When measuring out the recess, you will need two side pieces and a header. The header should be the width of the door + a 80 mm overhang, which will allow it to sit on top of the two side pieces. A picture of how it comes together will be shown below.
Side note! When marking out my door I opted to also mark in my overhang. This wasn't necessary but I did it anyway to give myself it's positioning later on when it came to create and place my overhang.

Cutting - Lesson 7
This lesson was focused on the cutting out of the individual parts. Unfortunately I was a bit forgetful and didn't take many pictures. Although this step is time consuming and tricky, it's fairly straight forward.


Cut windows first.
Top Tip! When cutting out curved or intricate bits it is a good idea to make practice cuts first in order to get used to the methods and procedures.

Then door.

Then Frame. Although it is drawn all the way to the bottom, your frame should only be cut to the base of the door. The frame should hopefully sit on the later constructed flooring or steps.

Then tabs and centre piece.

Then braces.

Then Recesses.


Building, painting and texturing - Lesson 8
This lesson was focused on the building of the actual door,

The first thing the model maker does is create the recess. It is of the utmost importance that all the measurements and cutting is correct because if either are off then your door will not come together perfectly. Nobody wants a wonky door. The two side recesses are the first pieces to be glued in place. Once these are secure the head is added. Once these are in place the frame is glued into the gap. This step is incredibly important because if it was done incorrectly then the door would no longer fit. Once this step is complete, a floor is quickly marked out, cut and glued into position.

In the picture my door is depicted as having an overhang. To create it I opted to use KAPAline foam board because it already had a suitable thickness and could be sanded to any shape. To get the thickness on the top I decided on mount board, and for the thickness on the bottom I used ticket card. I knew that it would have to cover a person as they stood outside so I decided on having my overhang at a 60 cm length. When it came to the width I simply measured out the overhang on the picture and transferred the information. To create the curve on the overhang I measured 5 cm less on length and 10 cm less on width, on some ticket card and sanded down the KAPAline. I then glued the three different components together and did some more sanding to make sure everything lined up.
To create the two supports I cut out two more pieces of KAPAline, added some ticket card and sanded in a curve. Unfortunately, once again I was quite silly and forgot to take pictures.

The other thing to do is to glue on the tabs and braces. It is particularly important for the bottom brace to be absolutely flush because it is what anchors the door to the base. If the triangular braces were cut accurately then the tabs should naturally go to a right angle. If the braces were not cut accurately then you have bigger problems.
My door had a tiny ridge along the outside of the window. To transfer this ridge over to the model, I measured out the window on some ticket card and then carefully cut a ring out of it. This was then added to the door. Unfortunately I didn't take any pictures of this but the ridge can be seen on the image of the door posted below. You are now a able to start painting your door.
Textures!
My wall didn't have much texture so all that was needed was to coat the walls in a very thin layer of polyfilla to to give it that tiny bit of texture and make it appear less perfectly smooth. I made a mistake here and coated the floor of the recess in polyfilla, which made the door in unable to fit as smoothly as it did. This cost me some valuable minutes as I had to scrape off the mixture with a craft knife. However, it did end up working in my favour as there is now some messy texture on the floor that wouldn't have been there otherwise. One part I am particularly proud of is my initial colour matching of the paint on the walls. I later lost a tiny bit of accuracy after I wiped on some dirty water to give the model a dirtier, more weathered look. To create the horizontal marks above the door I simply layered up some polyfilla and ran a plastic brush through it a few times. The floor wasn't visible so I chose a tarmac floor to keep with the already depressing aura of the door. To achieve this look I used the scatter method and coated the floor in PVA glue before adding an incredibly dark grey paint.

I am pretty proud of the door but do feel that I could have spent slightly longer on getting the colours to match more. To create the door I first coated it in a green paint. In end I think that my door is too bright to be what I wanted so if I were to repeat the project I would spend longer on getting matching tones. To get the tearing, broken quality I waited for the green paint to dry slightly before running my knife down it and tearing away the paint. I then dipped my brush in a very watered down dirty brown colour and dabbed at the torn away areas. This is probably my favourite part of the model just because I think it looks quite cool. 
The last few things to do before the final texturing is the placing of acetate as glass, hinging on the door, gluing the stairs and model to the base, and the adding of any more tiny details, like a door handle, writing or a door bell. To create the window, I marked out the size of the gap onto acetate, cut it out and glued it to the back of the door. The same thing was done for the planks on the window of the door itself. I think I was fairly fortunate here as my door was supposed appear dirty and I didn't have to worry too much about cleaning or being precise in certain areas. The door handle is simply a painted bead that was glued on. One thing I regret not doing is writing on the door number because it would have been really easy to do that increased realism and detail. The hinging of the door is a fairly straight forward process. All that is needed is a strip of masking tape and some PVA glue. To hinge the door a small amount of PVA is placed on the edge of the door, the frame and the back of the recess. The tape is cut down to size and placed on the glue on the door. The door is then put into position and the tape is smoothed over the rest of the glue.
Top Tip! Little beads make perfect door handles and flowers. 

Finally, all that remains to do is to add more texture to the base and overhang.
I wanted to give the impression of scattered debris and gravel. In order to get this effect I again used the scatter method. I placed pools of PVA glue and scattered mixed herbs into them. When it came to painting the debris I went haphazardly because I quite liked the uneveness of the paint as I feel it comes off as more varied and has a better aesthetic. 

Evaluation