Laying the cloth
Tools and Materials
To begin laying the floor cloth, the cloth is first laid flat out flat over the floor. The top end of the cloth is identified by a seam that runs across its length. Once the top end has been found two people are required to start nailing it into the floor. If the scenic artist is unable to nail into a floor for any reason (concrete, workshop rules...) they would then construct a wooden frame to hang the cloth on.
To secure the cloth into place the centre point is first identified and the first pin is hammered in. Working outwards in from this point one person will hammer the cloth into place and the other will pull it tight to remove any creases. Each pin should be placed roughly three inches, or the width of three fingers, away from the last one.
Once the top end of the cloth has been pinned into the place, the two scenic artists will move on to the opposite end of the cloth before pinning the left and right respectively.
Note! It is important not to hammer each pin completely into the cloth to allow the area around the pin to be painted. This is also true if you are hanging a cloth on a painting frame.
Study Task 5 - Differences in Painting
The ups and downs of Floor Painting
Benefits
I personally find that I have more control when facing downwards
The entire cloth is easily available
Paint doesn't drip
Downfalls
Every one walks all over it - Can get quite crowded
Dirty - mud and dust easily covers it
Extended periods of time on your hands and knees can put a strain on your body
Can't project image easily on it. This limits the scenic artist to plotting and the grid method.
Ups and Downs of Hanging
Benefits
Death
Less of a strain on the body
The scenic a
Problem Areas
Sponging and blending
I found my specific
Knowing exactly where to put the frog tape.
Study Task 6 - Process of Painting - Alice in Wonderland
Figurative Drawing Step 1
Priming
 Before the scenic artist is ready to transfer the design onto the floor cloth, the floor cloth first needs to have a base coat of white paint applied. This is especially important if the cloth has been previously painted, which ours was. Unfortunately I was AWL (away with leave) during this period so I was unable to properly experience this step. However, we did something similar to the flats we used for the end of year project for which we first applied a light layer of white paint. This serves the purpose of both hiding any previous work and making it easier for the paint to grip onto the surface. For this project we used Rosco's saturated white paint because it has a much stronger pigment that leads to a much whiter and thicker finish.
Step 2 - Plotting
Tools and Materials
Pattern
Snap Lines + Pounce Power
Flogger
Pencil
Frog Tape
Compass - Plywood, Drill
Tape Measure
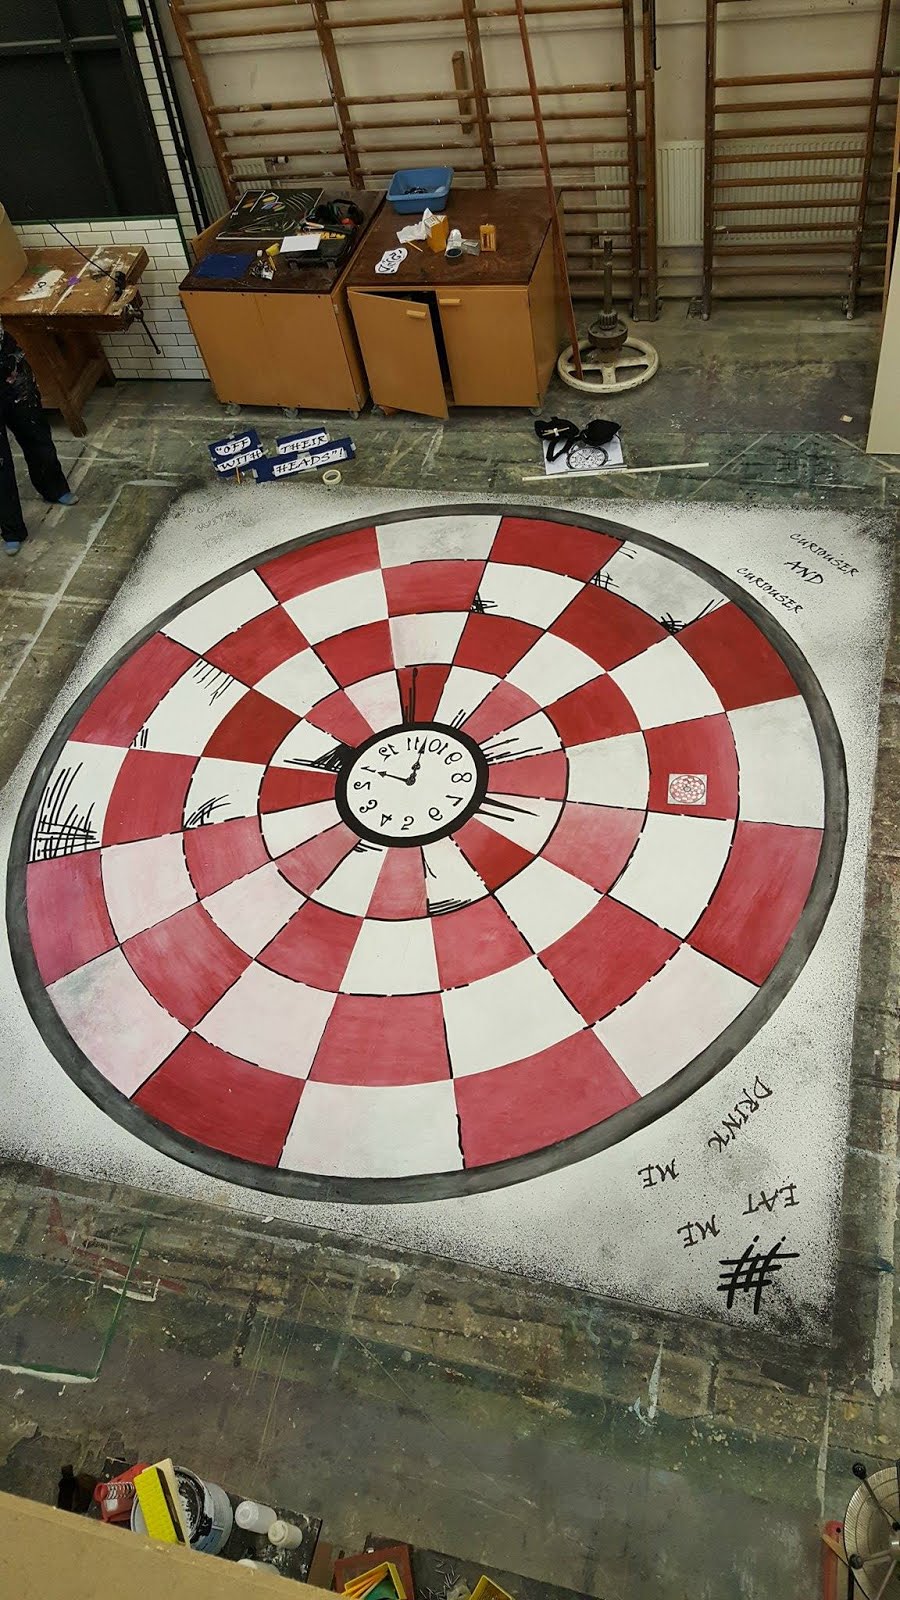
 To try and construct the perfect circles around the board we constructed a massive compass out of long and thin sheet of ply and drilled holes through at the correct radius for the circle. A pencil would then be inserted into each hole individually. One person would then stand in the absolute middle of the circle while the compass monkey would run in circles along the outside and pray that both ends of the circle met up, which luckily, they did. Once we had our rough circles complete we used snap lines and pounce powder to cut up the circles into segments.
 The problem with using pounce powder is that it leaves a dusty residue and that can mix with the paint and cause it to become dirty. To avoid this, floggers can be used to get rid of all the excess graphite. This can become quite tiring and I would avoid doing it for any extended periods of time.
 Once the basic outline of the shape had been achieved we used frog tape to place lines over the white squares. This served to highlight the correct areas to paint red and meant that an jolts with the paint brush would not spill out over the white squares.
Step 3
Painting
Step 4 - Writing and Clock Work
Tools
Pencil
Carbon Paper
Masking Tape
 When writing out words onto a floor cloth we discovered that the best way was to use carbon paper to transfer the design directly onto the cloth.
To do this the writing is first printed to the correct scale before being taped to the mat side of the carbon paper. The scenic artist then traces along the outside of the writing, which hopefully should leave a faint outline on the cloth. I initially struggled with this as I found I was touching far too lightly and could barely see the lines I had done. This was easily fixed by pressing down more with the pencil and by going over the lines with a pen. Once all the outlines have been covered in the carbon paper, the carbon paper is removed and the outlines were filled in using black permanent marker, which I think gave the final piece a much inkier and illustrative feel.
This method was also used in the marking out of the cloth. I think that this was the best method for the cloth because the projection would be unfeasable and the curves would have been too difficult to draw free hand.


Study Task 7 - Other Methods of Transferring Designs
Carbon Paper
When transferring writing, the scenic artist has two main options
Transfer paper - Black and white - Better quality, more expensive, larger sizes for larger transfers
Carbon Paper - Cheap, only A4, can only be used on harder surfaces- polystyrene is a no go.
Projection
An alternative route to take is to scale the original image up using a projector and then position the larger image onto the surface that needs painting. This is a quick and easy method of transferal that allows the scenic artist to recreate the original art exactly to designer's specifications.
I have used projection as part of my work for the immersive theatrical experience You Me Bum Bum Train in which we projected the Passenger's signature onto a fake check as part of a scene. While using this method we positioned the projection onto a wall and held the check in place while the other volunteer copied the signature onto the check. A downside I noticed to using this method was that a lot of the quality was lost in the process of blowing up the image. This was largely an issue with the small size of the signature and the great size we were blowing it up to. Additionally, However, due to the speed at which the passengers progressed through the scene it would have been unfeasible to use the grid method each time and we would have lost accuracy because it would have been impossible to recreate the original signature exactly. A further downside to using this method is that is that it is much more reliant on technology than the grid method. We continuously faced problems with the projector and computer not working, which meant that we were unable to continue at some points and had to use our best guess. Unfortunately, no pictures are available for this example as we were forced to agree to absolute secrecy to the actual scene content.

To the right is a fantastic image of a scenic artist using projection to quickly and easily map out the image of a zebra.
Image References
http://art.emich.edu/news/tech-talk-5-artograph
No comments:
Post a Comment